How to Use a Laser Calibration Card for Perfect Cuts (2026)
A laser calibration card finds your perfect speed and power settings for any material in under 5 minutes — with zero wasted full sheets and no trial-and-error. Most laser cutters waste 5–10 sheets per new material getting settings right. A calibration card collapses that process into a single small test piece that costs pennies. In this guide you’ll learn exactly how to use one, how to read the results, and how to save settings so you never recalibrate the same material twice. Every Crafteker basswood order includes a free Precision Calibration Card designed for 3mm laser-grade basswood.
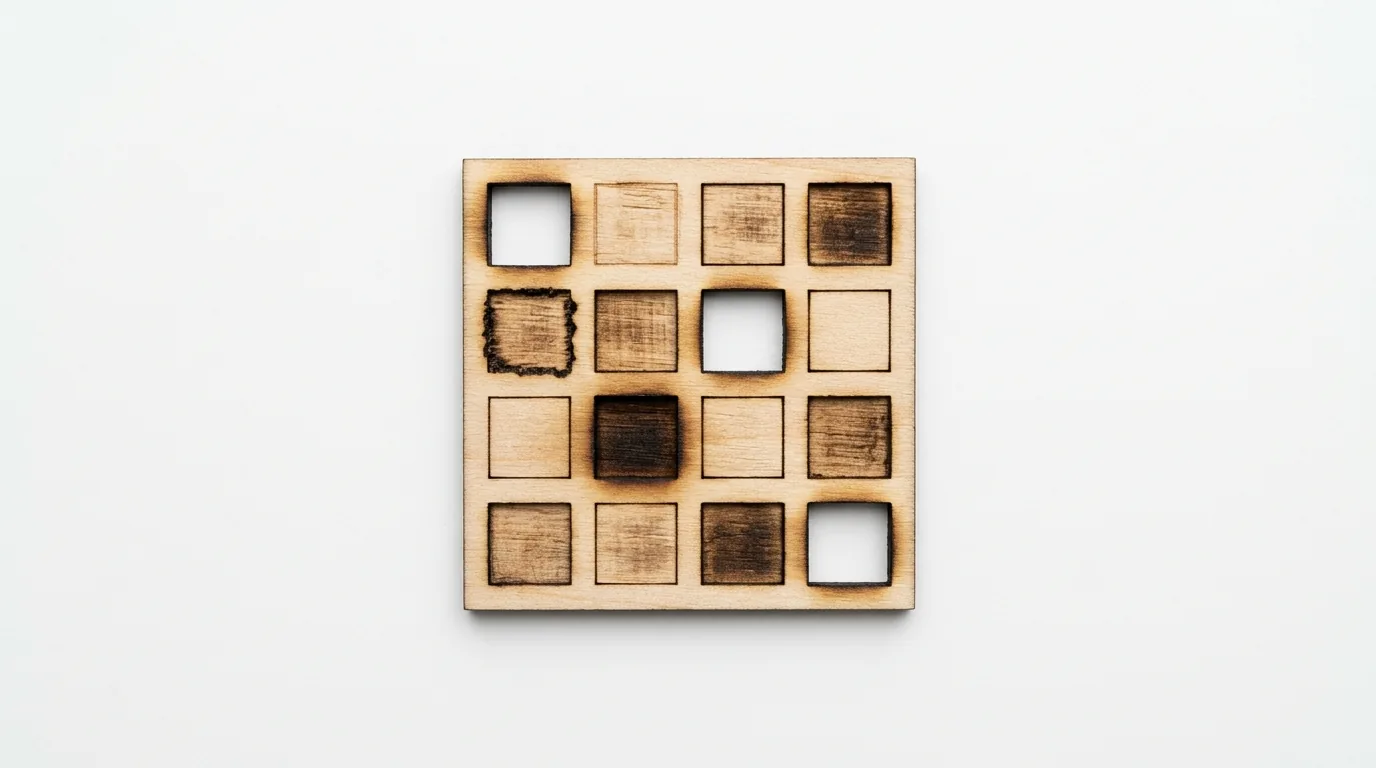
A 4×4 calibration matrix run on 3mm basswood — each square tests a different speed/power combination. The optimal square is row 3, column 2 (clean cut, minimal charring).
What Is a Laser Calibration Card and Why Does It Matter?
A laser calibration card is a pre-designed test file that runs a matrix of speed and power combinations on a small piece of your material. Instead of guessing settings or copying someone else’s numbers that may not match your specific machine, the card gives you empirical results on your actual setup in one run.
The reason settings vary between machines is important to understand. Two xTool D1 Pro 10W units can cut differently because of slight differences in laser diode output, lens focus, and ambient humidity. Published settings are a starting point — the calibration card gives you the real answer for your machine, on your material, on the day you’re cutting.
| Method | Time to dial in settings | Sheets wasted | Accuracy |
|---|---|---|---|
| Trial and error (no card) | 30–60 min | 3–8 sheets | Medium |
| Copy published settings | 5 min | 1–3 sheets | Low–Medium |
| Calibration card | 5–10 min | 1 small card | High |
How Do You Use a Laser Calibration Card Step by Step?
- Place the card flat on your laser bed — use honeycomb pins or tape corners to prevent warping during the cut. Any movement between squares ruins the test.
- Import the calibration SVG into LightBurn (or LaserGRBL, xTool Creative Space, etc.) — the card comes pre-scored with 16 labeled squares in a 4×4 grid.
- Set your speed range across columns — a good starting range for 3mm basswood is 2 mm/s, 4 mm/s, 6 mm/s, 8 mm/s.
- Set your power range across rows — test 70%, 80%, 90%, 100% power.
- Enable air assist if available — this is part of your final setup, so test with it on.
- Run the full matrix — the laser cuts all 16 squares in sequence. Total time: 5–10 minutes.
- Flip the card and examine results — look at each square from below (backlit if possible). A clean cut-through shows as a bright line from below.
- Select the winning square — the fastest speed at the lowest power that cuts fully through, with the least edge charring.
- Save as a LightBurn material preset — name it “Crafteker 3mm Basswood — [your machine] — [date]”.
How Do You Read Calibration Card Results?
After cutting, hold each square up to a light or flip the board to check from below. Look for these three outcomes:
- Full cut-through (bright line from below) — this square’s settings work. Find the one with the least surface charring.
- Partial cut (dim light from below) — not enough power or too fast. Add one pass before adjusting settings.
- Heavy charring with clean cut — the cut works but at the cost of edge quality. Try the next row (faster speed, same power).
The ideal square shows a clean cut-through with pale edges and minimal surface darkening. On 3mm basswood, that’s usually the intersection of 4–6 mm/s at 100% power on a 10W diode laser.
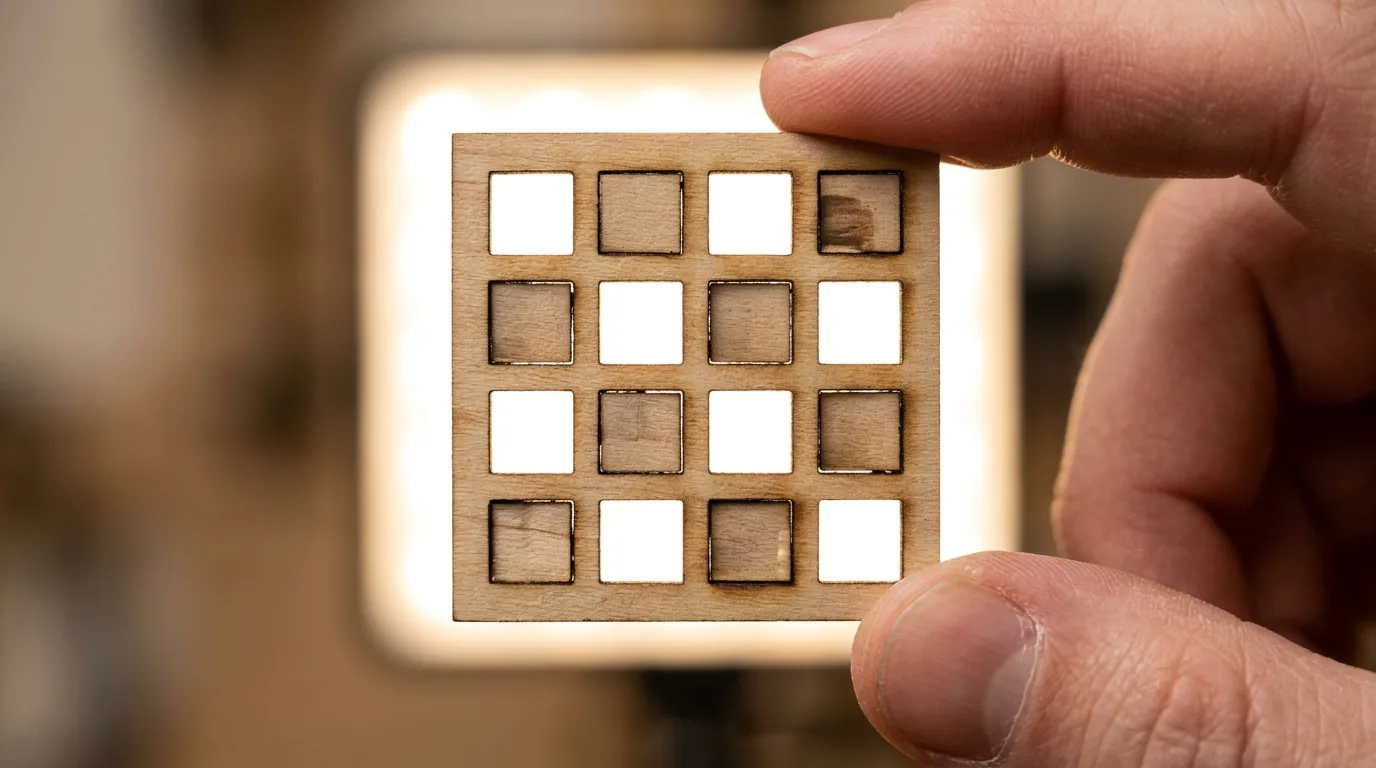
Reading calibration results backlit — the bright squares (bottom right cluster) show full cut-through. The winner is the brightest square with the least edge charring.
What Are the Most Common Calibration Mistakes to Avoid?
- Testing without air assist on — if your final setup uses air assist, always calibrate with it. Results will differ significantly.
- Not securing the card flat — any bow or warp changes the focal distance across squares and skews results.
- Using a full sheet instead of a card — wasteful. The card uses a 100mm × 100mm piece maximum.
- Calibrating once and never again — laser diodes degrade over time. Re-calibrate every 50–100 cutting hours or when you open a new box of sheets.
- Ignoring the pass count variable — the matrix tests speed and power but not pass count. Once you find the best square, test 1 vs. 2 passes with those settings.
Frequently Asked Questions About Laser Calibration Cards
What is a laser calibration card?
A laser calibration card is a pre-scored test grid that you cut on a small piece of basswood to find the optimal speed and power settings. It tests 16 combinations at once, saving you from trial-and-error on full project sheets.
How do I use a laser calibration card?
Place the card on your laser bed, import the SVG into LightBurn, set a speed/power range, run the matrix, and identify the square with the cleanest full cut-through. The whole process takes 5–10 minutes.
Do I need a calibration card for every new material?
Yes — especially when switching between brands or thicknesses. Even the same 3mm basswood can vary ±0.2mm between batches, which affects cut-through. One quick calibration run saves ruined project sheets.
What is included in Crafteker’s precision calibration card?
Crafteker’s card includes a 4×4 speed/power matrix pre-scored for 3mm basswood, plus instructions. It comes free with every order (12-pack, 5-pack, and 3-pack) and works with all diode lasers including xTool, Glowforge, Atomstack, Sculpfun, and OMTech.
How long does a laser calibration test take?
A full 4×4 matrix on 3mm basswood takes 5–10 minutes depending on your machine speed. Reading results takes under a minute. Most users dial in settings in a single run.
More Laser Cutting Guides
- Basswood Laser Cutting Settings: Complete 3mm Guide for All Machines
- Best Basswood for xTool Laser: D1 Pro, S1 & P1 Settings
- Best Basswood for Atomstack Laser Cutter: Settings & Review
- How to Prevent Charring When Laser Cutting Wood
According to LightBurn’s official material testing guide, running a speed/power matrix is the recommended first step when cutting any new material — a practice that experienced makers call “calibration card testing.”
The Bottom Line: Get Your Settings Right the First Time
A laser calibration card is the single most effective tool for eliminating wasted sheets and frustrating restarts. Five minutes of testing saves hours of troubleshooting. Every Crafteker 12-pack includes a free Precision Calibration Card plus a curated SVG pack — so your first project is ready to cut the day your order arrives.
→ Shop Crafteker Basswood on Amazon — Includes Free Calibration Card
Written by Mike Dolan — laser maker and wood materials specialist with 8+ years cutting basswood, birch, and MDF on diode and CO₂ machines including xTool, Glowforge, Atomstack, and OMTech.
I wasted SO many sheets before finding this method. One calibration run and I had my xTool D1 Pro dialed in perfectly. The free card that came with the Crafteker order made it super easy — literally 5 minutes and done.